Post Disclaimer
Disclaimer: This content is for educational purposes only, not medical advice. Always consult with a doctor before making significant changes to your diet, especially if you have pre-existing health conditions.

Let me be honest: the first time I tried making protein balls, they turned out like dry little bricks. My kids called them “chocolate dirt bombs” (rude, but fair). I was just trying to find a snack that didn’t come in a crinkly wrapper and wouldn’t spike everyone’s sugar levels right before dinner. You’ve been there, right?
Well, after a few rounds of messy mixing, too many “meh” batches, and one miraculous tweak involving salt and cocoa, I finally landed on a version that didn’t just pass it disappeared from the fridge in a day.
These salted chocolate protein balls are the perfect bite: sweet, a little salty, packed with good-for-you ingredients, and completely no-bake. They’ve become our go-to “mom snack,” lunchbox treat, and workout fuel. You can batch them in minutes, store them for the week, or freeze them for later.
And here’s the best part? You don’t need a fancy protein powder or weird ingredients from a health food store. Just real stuff you likely already have.
In this post, I’ll walk you through:
- The exact recipe for these salted chocolate bites
- Storage tips to keep them fresh
- Freezer tips (because double batching is genius)
- And my favorite swaps and boosts for flavor or nutrition
Let’s roll.
Table of Contents
Key Takeaways: What You Need To Know
- Salted chocolate protein balls are a no-bake, high-protein snack made with cocoa, nut butter, oats, and a touch of sea salt.
- You can store them in the fridge for up to 7 days or freeze them for up to 3 months.
- They’re perfect for meal prep, kids’ snacks, post-workout bites, or healthy desserts.
- The recipe is easy to customize based on your pantry: use peanut butter, almond butter, or even tahini.
- Add-ins like chia, flax, coconut, or even a collagen boost (like my gelatin trick recipe) work beautifully.
The Story Behind These Salted Chocolate Protein Balls
What inspired this recipe?
It started like most of my kitchen adventures: desperation. A hungry toddler, an empty snack drawer, and one too many granola bars that cost more than a latte. I remember standing in my kitchen, staring at a half-empty jar of peanut butter and thinking, “There’s got to be a better snack than crackers and apples again.”
I’d seen recipes for chocolate protein balls floating around some from fitness influencers, some from Pinterest deep dives. But most of them either had way too many ingredients or just didn’t taste good. Dry. Chalky. Bitter. Or loaded with sweeteners that gave me a headache.
So, I did what any stubborn mom does: I started tweaking.
A little cocoa for chocolate flavor. A spoonful of maple syrup for just enough sweetness. A generous pinch of salt (because that’s the magic, y’all). And a scoop of my favorite clean protein powder.
Then I tasted it.
Game. Changed.
They were soft, chewy, chocolatey, and had just the right salty-sweet finish to keep me reaching for “just one more.” I’ve been making these weekly ever since especially during busy seasons like back-to-school and holiday baking chaos when I want a treat that won’t derail my day.
Why add salt to chocolate protein balls?
If you’ve ever had salted caramel or sea salt dark chocolate, you know the answer to this. Salt wakes up the flavor in chocolate like nothing else. It doesn’t make the balls salty it makes them bold and balanced. Just a tiny pinch of flaky sea salt cuts the richness and keeps you coming back for more.
Plus, if you’re using these as a post-workout snack, the salt can help with electrolyte balance a nice little bonus that pairs well with this baking soda trick I sometimes use for hydration support.
Ingredients That Make Salted Chocolate Protein Balls Irresistible
Salted chocolate protein balls come together with a handful of pantry staples. No baking, no fancy tools just real food that fuels you. Every ingredient in this recipe plays a role in texture, flavor, and function.
Here’s a closer look at what makes these salted chocolate protein balls the perfect snack.
What ingredients are used in salted chocolate protein balls?
Salted chocolate protein balls use rolled oats, cocoa powder, nut butter, protein powder, maple syrup, vanilla, and sea salt. Optional add-ins like coconut, chia seeds, or mini chocolate chips can boost nutrition and flavor.
Why these ingredients work together
Let’s break it down:
1. Rolled oats – These are the heart of the recipe. They provide structure and chew. I prefer old-fashioned rolled oats (not quick oats) because they hold their shape better and give that perfect soft-but-not-mushy bite.
2. Unsweetened cocoa powder – This is what turns plain protein balls into chocolate protein balls. I use Dutch-processed cocoa for a deeper flavor, but regular cocoa works just fine.
3. Nut butter – Peanut butter is my default, but almond butter or even cashew butter works too. It adds creaminess and binds everything together. Want a nut-free version? Try sunflower seed butter.
4. Protein powder – You’ll want a good-quality one here. I use vanilla or chocolate-flavored plant-based powder for this recipe. If you’re curious about gelatin protein blends, check out my gelatin trick recipe it’s a game-changer for skin, hair, and gut support.
5. Maple syrup – Just a little! This natural sweetener balances the bitterness of cocoa and helps everything stick.
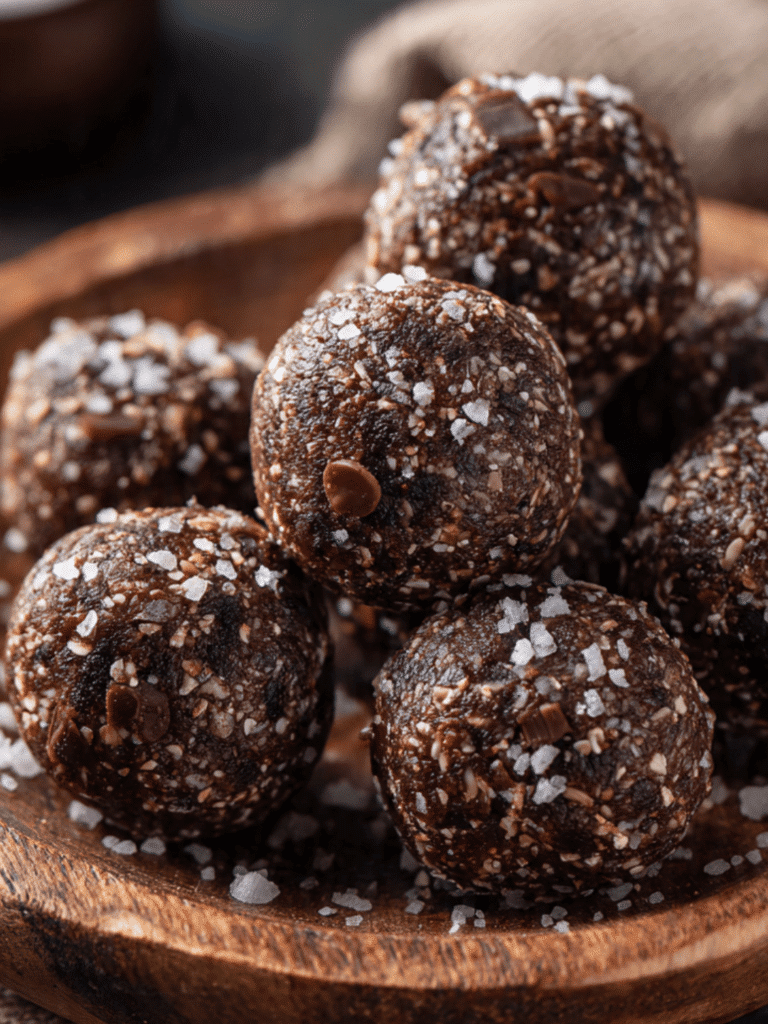
6. Sea salt – The star of the show. Just a pinch of flaky sea salt takes these salted chocolate protein balls from good to dangerously addictive.
7. Vanilla extract – Optional, but worth it. Vanilla brings out the chocolate flavor even more.
Optional Add-Ins That Boost Nutrition
These little extras take your salted chocolate protein balls to the next level:
| Add-In | Benefit |
|---|---|
| Chia seeds | Fiber + omega-3s |
| Flaxseed | Hormone balance support |
| Coconut flakes | Texture + healthy fat |
| Mini chocolate chips | Fun + flavor |
| Collagen peptides | Extra protein (try this recipe for inspiration) |
I’ve even experimented with adding a touch of blue salt for extra minerals totally optional, but if you have it, try it.
Ingredient Swaps & Customization Tips
Here’s what I love about salted chocolate protein balls: you can make them your own. Don’t have oats? Sub with ground almonds or coconut flour (start small coconut flour absorbs a lot of moisture).
Want more sweetness? Add a chopped date or a drizzle of honey.
Need a little crunch? Toss in some crushed nuts or cacao nibs.
Just don’t skip the salt. Seriously.
How to Make Salted Chocolate Protein Balls Step-by-Step
To make salted chocolate protein balls, mix oats, cocoa, protein powder, and salt in a bowl. Stir in nut butter, maple syrup, and vanilla. Roll into balls, chill, and store in an airtight container.
Step-by-Step Instructions
Making these salted chocolate protein balls takes less than 10 minutes and doesn’t require any fancy equipment. Seriously if you can stir and roll, you’ve got this.
Here’s exactly what you’ll need:
Ingredients:
- 1 cup rolled oats
- 1/4 cup unsweetened cocoa powder
- 1/2 cup nut butter (peanut, almond, or your favorite)
- 1/4 cup maple syrup or honey
- 1 scoop protein powder (vanilla or chocolate)
- 1/2 tsp vanilla extract
- 1/4 tsp sea salt + more for sprinkling
- Optional: 2 tbsp mini chocolate chips, shredded coconut, or chia seeds
Directions:
Step 1: Mix the dry ingredients
In a medium mixing bowl, stir together oats, cocoa powder, protein powder, and salt. Use a fork or spatula to break up any clumps.
Step 2: Add wet ingredients
Add your nut butter, maple syrup, and vanilla to the dry mix. Stir well until everything comes together into a sticky dough.
Mom Tip: If the dough feels dry, add a tiny splash of milk (any kind) or a little extra syrup. If it’s too wet, toss in more oats a tablespoon at a time.
Step 3: Roll into balls
Scoop out tablespoon-sized portions and roll them into balls with clean hands. I usually get about 12–14 balls from this recipe.
Step 4: Sprinkle with salt (optional but amazing)
Once rolled, sprinkle a pinch of flaky sea salt on top of each ball. This gives them that signature “salted chocolate” pop that takes them over the top.
Step 5: Chill and store
Pop the balls in the fridge for about 30 minutes to firm up. Then transfer to an airtight container.

Storage Tips That Keep Them Fresh
How long do salted chocolate protein balls last?
In the fridge: up to 7 days
In the freezer: up to 3 months
I usually make a double batch and freeze half. That way, there’s always a stash ready when hunger hits or when I need a treat after the kids go to bed. (You know the moment.)
Try pairing a couple of these with tea and a spoonful of my horse salt trick for men yes, it works for women too for a post-workout recovery treat.
Real-Life Shortcut
Sometimes I just press the whole batch into a small baking dish, chill it, and cut them into bars instead of rolling. It’s faster, less messy, and still totally snackable.
Either way, the result is the same: soft, chewy, salted chocolate protein balls that satisfy like a treat but nourish like a superfood.
Why Salted Chocolate Protein Balls Are a Healthy Choice
Salted chocolate protein balls are a healthy snack packed with fiber, healthy fats, and protein. They’re ideal for blood sugar balance, workout recovery, and keeping energy levels steady throughout the day.
Are salted chocolate protein balls actually healthy?
Yes and here’s why I feel good giving them to my kids and grabbing a few for myself on a busy workday.
Each batch of salted chocolate protein balls includes:
- Protein for sustained energy and muscle repair
- Fiber from oats and nut butter to support digestion
- Healthy fats that help you feel full and satisfied
- Minimal added sugar, especially compared to store-bought bars
They check all the boxes: no refined sugar, no artificial junk, no baking required. They’re also gluten-free and can easily be made dairy-free or vegan depending on your protein powder.
If you’ve ever tried the eating bird food protein balls online, this recipe delivers the same kind of nutrition but with that addictive sweet-salty chocolate flavor that keeps it exciting.
Who should eat salted chocolate protein balls?
Honestly? Pretty much anyone.
These chocolate protein balls are a win for:
- Busy moms who need one-handed fuel between carpool runs
- Kids who want a sweet treat without a sugar crash
- Teens with bottomless appetites
- Athletes or gym-goers looking for clean post-workout fuel
- Anyone cutting back on processed snacks
If you or someone in your house is on a high-protein diet, try adding a scoop of collagen peptides or check out my Dr. Mark Hyman–inspired gelatin protein balls for a gut-healing twist.
Real-Life Testimonial
“These are the only protein balls my kids actually ask for! I’ve tried a bunch of other recipes, but Lora’s salted chocolate version is the only one that doesn’t end up forgotten in the fridge. I make a double batch every Sunday and they never last the week.”
Jen M., mom of 3, Portland, OR
How much protein is in each ball?
It depends on your protein powder, but most salted chocolate protein balls pack about 6–8 grams of protein per ball, especially if you use a full scoop per batch. That’s enough to hold you over between meals or give your muscles a little post-workout love.
Pair them with a smoothie or a hard-boiled egg, and you’ve got a mini-meal.
Salted Chocolate Protein Balls
Ingredients
Equipment
Method
- In a medium bowl, mix together the rolled oats, cocoa powder, protein powder, and sea salt.
- Add the nut butter, maple syrup, and vanilla extract. Stir until a thick dough forms.
- Fold in any optional add-ins like chocolate chips, coconut, or chia seeds.
- Scoop tablespoon-sized portions and roll into balls using clean hands.
- Sprinkle lightly with extra flaky sea salt if desired.
- Chill in the refrigerator for 30 minutes before serving or storing.
Nutrition
Notes
Tried this recipe?
Mention @Cheflorarecipes or tag #cheflorarecipes!Variations of Salted Chocolate Protein Balls You’ll Want to Try
You can easily customize salted chocolate protein balls with coconut, almond, or espresso for flavor variety. Add-ins like chia seeds, spices, or extracts allow endless combinations.
Chocolate Coconut Protein Balls
If you love chocolate coconut protein balls, this one’s for you.
To the base recipe, add:
- 2 tablespoons unsweetened shredded coconut
- 1/2 teaspoon coconut extract (optional, but it punches up flavor)
Roll each ball in a little extra coconut after forming it gives a snowy, bakery-style finish and a nice chewy bite.
Why this combo works: Coconut adds natural sweetness, healthy fat, and an extra layer of texture. It turns your protein balls into something that feels like dessert.
Almond Joy Protein Balls
Channel those nostalgic candy bar vibes with a healthy twist.
Mix in:
- 2 tablespoons sliced or chopped almonds
- 1 tablespoon shredded coconut
- Optional: 1–2 teaspoons mini dark chocolate chips
These salted chocolate protein balls suddenly taste like candy but with balanced macros, fiber, and zero guilt.
If you’re looking for even more mineral support in your snacks, you can pair these with my blue salt trick before or after your workout.
Other Delicious Flavor Combos
Here are some of my favorite tweaks to the base salted chocolate protein balls recipe:
| Variation | Add-Ins |
|---|---|
| Mocha Energy Balls | 1 tsp instant espresso powder or brewed coffee concentrate |
| Pumpkin Spice Balls | 2 tbsp canned pumpkin + 1/2 tsp pumpkin spice |
| Cherry Chocolate | 2 tbsp dried tart cherries (chopped) + 1/4 tsp almond extract |
| Nut-Free Version | Use sunflower seed butter + oat flour |
You can also sneak in a pinch of cinnamon or ginger for a warming twist in winter.
Bonus Boosters for Functionality
Want to add a little something-something? Try:
- Maca powder – hormone balance and energy
- Ground flaxseed – fiber and omega-3s
- Ashwagandha – calming adaptogen (just 1/2 tsp is plenty)
- Collagen powder – adds protein without flavor change
And if you’re experimenting, check out my baking soda trick to support recovery and hydration. It pairs perfectly with these balls after a hard workout or a long day on your feet.
How to Store and Freeze Salted Chocolate Protein Balls
Salted chocolate protein balls stay fresh in the fridge for 7 days in an airtight container. To freeze, store in a zip-top bag for up to 3 months. Thaw at room temperature or in the fridge overnight.
How to Store Salted Chocolate Protein Balls
Once your salted chocolate protein balls are rolled and chilled, you’ll want to keep them fresh and chewy not dry or crumbly.
Fridge storage:
Place the protein balls in an airtight container or glass jar with a lid. You can stack them with parchment paper if they’re a little sticky. Stored this way, they’ll last up to 7 days.
Bonus tip:
Add a slice of apple or a marshmallow to the container it helps maintain moisture (just like when storing cookies).
Can You Freeze Salted Chocolate Protein Balls?
Yes, absolutely and you should.
I almost always double the batch and freeze half. It’s one of the best mom hacks I’ve found. These balls freeze beautifully and taste just as good weeks later.
Here’s how to do it:
1. Arrange the protein balls on a parchment-lined tray in a single layer.
2. Freeze for 1 hour until firm.
3. Transfer to a zip-top freezer bag or freezer-safe container. Label with the date.
They’ll keep up to 3 months frozen.
To thaw:
Pull out a few and let them sit at room temp for 10–15 minutes or pop them in the fridge overnight.
Busy morning? Toss a frozen salted chocolate protein ball in a lunchbox. It’ll be perfectly thawed by snack time.
Weekly Snack Prep Plan
If you’re a Sunday meal-prep kind of person (or want to be), here’s a quick schedule to keep snacks on autopilot:
| Day | Task |
|---|---|
| Sunday | Make 1–2 batches of salted chocolate protein balls |
| Monday | Store half in the fridge, freeze the rest |
| Wednesday | Pull 3–4 from the freezer for the rest of the week |
| Friday | Optional second batch or flavor variation (like chocolate coconut protein balls) |
This takes maybe 15 minutes total and keeps you stocked with grab-and-go fuel no bars, no blender cleanup, no last-minute pantry raids.
Batch-Friendly Variations
Try rotating your flavors so you never get bored. One week I’ll do the classic salted chocolate protein balls, the next I’ll go almond joy-style, and sometimes I’ll sneak in seasonal options like pumpkin spice or peppermint mocha in December.
It keeps things exciting without starting from scratch every time.

FAQs About Salted Chocolate Protein Balls
How do you make protein balls?
To make protein balls, mix rolled oats, nut butter, cocoa powder, protein powder, maple syrup, and sea salt in a bowl. Roll into balls, chill for 30 minutes, and store in an airtight container.
How do you store protein balls?
Store salted chocolate protein balls in an airtight container in the fridge for up to 7 days. For longer storage, freeze them for up to 3 months and thaw as needed.
Can you freeze protein balls?
Yes!
Place protein balls on a tray to freeze individually, then transfer to a zip-top freezer bag. They’ll stay fresh for 3 months. Let them thaw at room temp or in the fridge before eating.
Are chocolate protein balls healthy?
Absolutely.
Salted chocolate protein balls are a nutrient-dense snack made with oats, healthy fats, and quality protein. They’re naturally sweetened and ideal for blood sugar balance, meal prep, or post-workout recovery.
Conclusion
If you’re looking for a snack that hits the sweet spot between healthy and crave-worthy, salted chocolate protein balls are it. They’re no-bake, endlessly customizable, and mom-tested (a.k.a. kid-approved). Whether you keep a batch in the fridge or freeze them for busy weeks, they’re a smart way to stay fueled and feel like you’re sneaking a treat.
From one tired, snack-hunting mom to another: try these. You might just skip the candy aisle for good.
And hey if you try them, tag me on Instagram. I love seeing your kitchen wins!